You’ve picked out a new sliding patio door. You’ve compared glass packages, frame materials, and locking systems. Now comes the part that actually determines whether the door performs for 25 years—or starts sticking, leaking, and fogging within five.
Installation.
Here’s what most homeowners don’t realize: a sliding patio door is one of the heaviest, most alignment-sensitive pieces of hardware in a home. The frame must be perfectly level and square. The track must be flat. The flashing must be sequenced correctly. Get any of those wrong, and even a premium door will underperform.
That’s why professional sliding patio door installation isn’t a “nice to have.” It’s the difference between a door that glides and a door that grinds.
This guide walks you through the entire installation process—step by step—so you know what to expect on installation day, what to watch for, and how to make sure the job is done right. And when you’re ready to schedule, Windowz4Less Arizona works with homeowners across the Phoenix metro area.
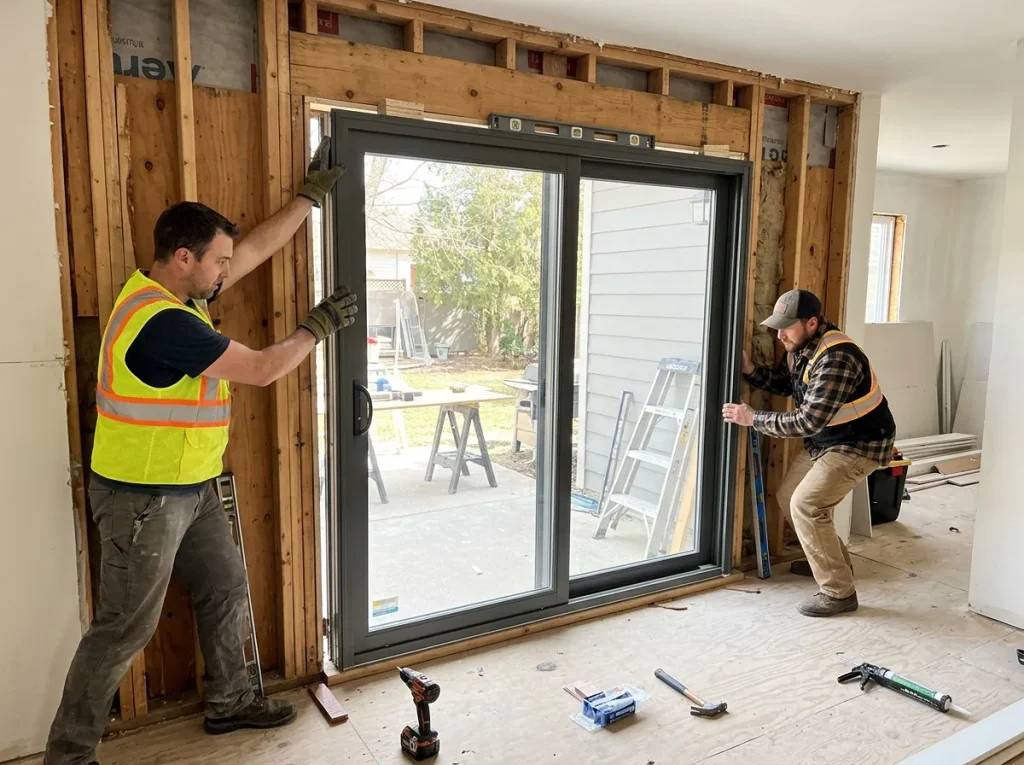
Table of Contents
Why Professional Installation Matters for Sliding Doors
The Sliding Patio Door Installation Process: Step by Step
How Long Does Sliding Patio Door Installation Take?
How Much Does Sliding Patio Door Installation Cost?
Common Sliding Patio Door Installation Mistakes
Real-World Conditions: The “If/Then” Guide
The Regrets Homeowners Mention Most
Key Takeaways / Quick Summary
- A standard sliding patio door replacement takes 2–4 hours; larger or custom units take longer
- Professional installation labor typically runs 300–800+, with total installed costs of 1,500–5,000+
- Waterproofing is the most critical step—improper flashing is the leading cause of door leaks
- The frame must be perfectly level and square; a track that’s off by a fraction of an inch will cause binding
- Windows account for 25–30% of residential heating and cooling energy use (U.S. Department of Energy), and a poorly sealed slider wastes that energy
- ENERGY STAR-certified doors lower household energy bills by an average of 12%
- Arizona’s stucco exteriors require cutting back the stucco to access structural framing
- Professional installation protects your warranty—most manufacturers require it
Why Professional Installation Matters for Sliding Doors
Let’s be direct. Sliding patio doors are not a beginner DIY project.
They’re heavy. A two-panel unit with glass can weigh 200+ pounds. Handling it safely requires at least two people, and one wrong move can damage the door—or injure you.
They’re alignment-sensitive. The track must be perfectly level. The frame must be square. If either is off, the panel binds, the rollers wear out prematurely, and the seal fails.
They need proper waterproofing. Exterior sliders are a common source of water intrusion. In Arizona, monsoon season makes this even more critical.
They require structural anchoring. The frame must be secured into structural framing—not just stucco or drywall.
Most manufacturer warranties require professional installation. DIY or unqualified installation can void coverage, leaving you unprotected if the seal fails.
The bottom line: Professional installation isn’t a luxury—it’s an investment in performance, longevity, and warranty protection.
The Sliding Patio Door Installation Process: Step by Step
Here’s what professional installation looks like from start to finish.
Step 1: Assessment and Measurement
Before any work begins, the installer assesses the opening and takes precise measurements.
What they do:
- Measure the rough opening width, height, and depth at multiple points
- Check the squareness of the opening using diagonal measurements
- Inspect the existing frame and wall structure for damage
- Confirm the door swing direction and panel configuration
- Identify structural framing locations for anchoring
Why it matters: Sliding doors are unforgiving. If the opening is out of square by more than a fraction of an inch, the track won’t sit flat and the panel will bind.
Time: 20–30 minutes
Step 2: Removing the Old Door
What they do:
- Score paint and caulk lines to prevent damage to surrounding walls
- Remove the door panels, frame, and hardware
- Dispose of the old unit
- Protect floors and surrounding surfaces
Why it matters: Careful removal prevents damage to the wall, trim, and flooring—and exposes the rough opening for inspection.
Time: 30–60 minutes
Step 3: Inspecting and Preparing the Rough Opening
What they do:
- Check for rot, water damage, or structural issues
- Repair any damage before proceeding
- Clean the opening and remove debris
- Confirm the opening is square and level
Why it matters: Hidden rot or water damage can compromise the new door’s performance. It’s better to find and fix these issues before installation.
Arizona tip: In older Arizona homes, sun damage and dry rot around exterior door frames are common—especially on west- and south-facing openings.
Time: 15–30 minutes
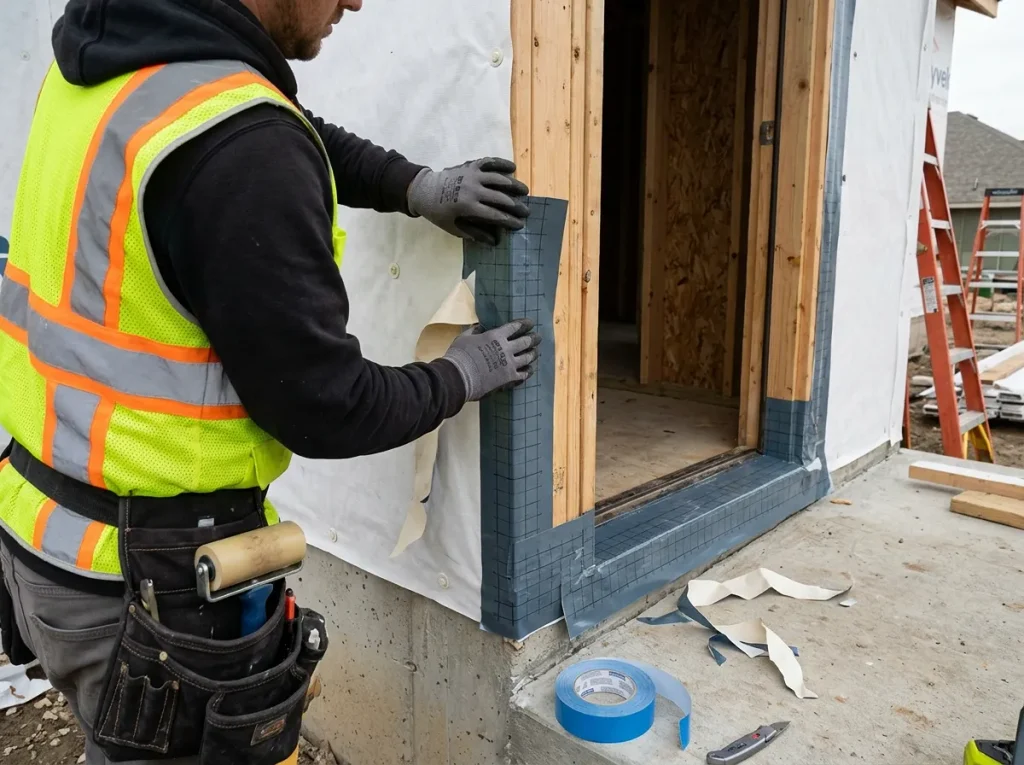
Step 4: Waterproofing and Flashing
This is the most critical step in the entire process. Water infiltration is the leading cause of door failure.
What they do:
- Apply self-adhering waterproof membrane around the opening—under the sill, along the sides, and across the top
- Install a sill pan or sloped sill to direct water away from the wall
- Apply flashing tape in shingle-style layers (sill first, then sides, then top)
Why it matters: Improper flashing is the #1 source of door leaks. Water intrusion leads to rot, mold, and structural damage—often discovered years later.
Time: 30–45 minutes
Step 5: Setting the Frame
What they do:
- Apply a bead of sealant around the perimeter of the opening
- Lift the door frame into place (requires two or more installers)
- Center the frame in the opening
- Use shims to level and square the frame
- Check level and plumb on all sides—including the track
Why it matters: If the frame and track aren’t perfectly level, the sliding panel will bind, the rollers will wear out, and the door won’t seal.
Time: 30–45 minutes
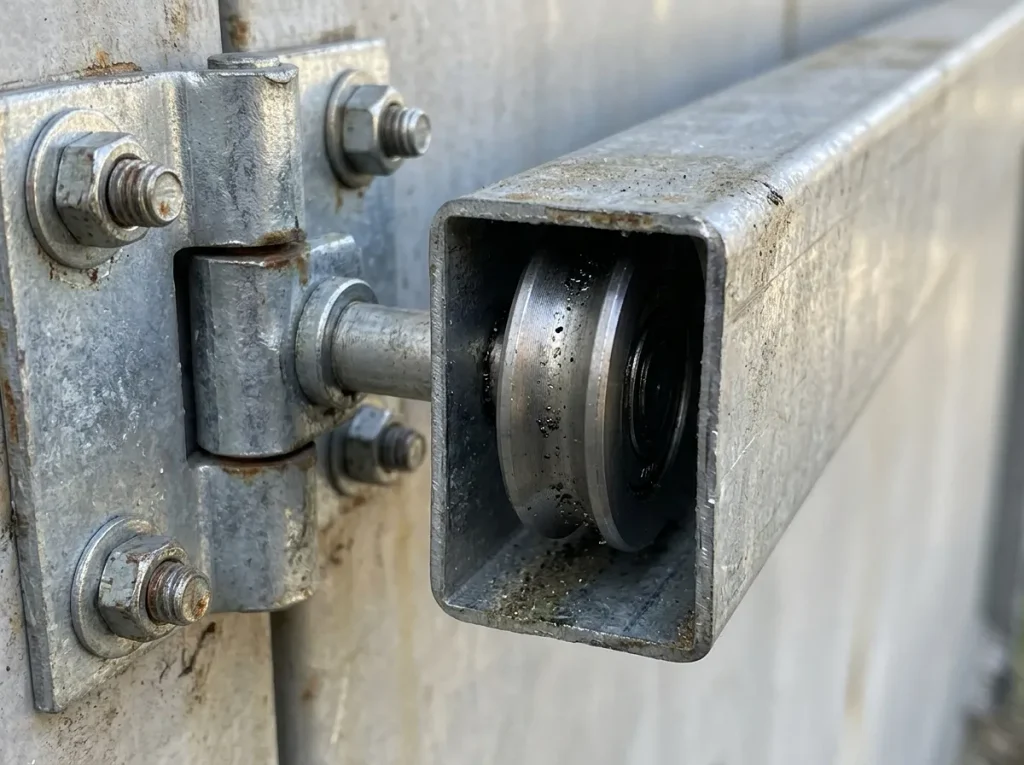
Step 6: Anchoring the Frame
What they do:
- Anchor the frame into structural framing using appropriately sized fasteners
- Use multiple anchor points along the frame
- Verify the frame remains level and square after anchoring
Why it matters: Proper anchoring ensures the door stays secure and doesn’t shift over time. Anchoring only into stucco or drywall leaves the door vulnerable.
Time: 20–30 minutes
Step 7: Installing the Sliding Panel and Hardware
What they do:
- Set the sliding panel into the track
- Adjust rollers for smooth operation
- Install the lock, handle, and any secondary security hardware
- Confirm the panel glides smoothly and the lock engages properly
Why it matters: Roller adjustment is where many installations go wrong. A panel that’s too tight will bind; one that’s too loose will rattle and leak air.
Time: 30–45 minutes
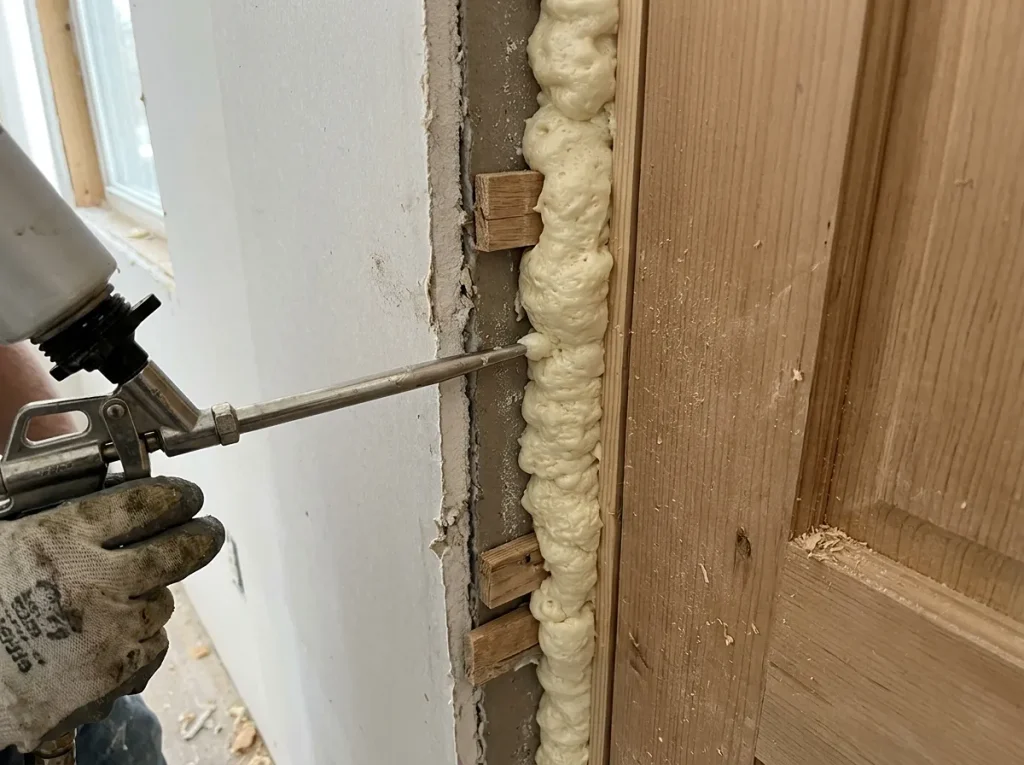
Step 8: Insulating and Sealing
What they do:
- Fill gaps between the frame and the rough opening with low-expansion spray foam designed for doors and windows
- Apply exterior sealant around the perimeter
- Install or verify weatherstripping
- Check for air leaks
Why it matters: Standard high-expansion foam can bow the frame and lock the door in place. Low-expansion foam is essential. Proper sealing prevents air leaks, water infiltration, and energy loss.
Time: 20–30 minutes
Step 9: Testing and Final Inspection
What they do:
- Slide the panel open and closed multiple times
- Check that the lock engages smoothly
- Test for air leaks around the frame
- Confirm the track is clean and the panel doesn’t bind
- Clean up debris and walk through the operation with you
Why it matters: The final inspection catches any issues before the installer leaves—when they’re easiest and cheapest to fix.
Time: 15–30 minutes
How Long Does Sliding Patio Door Installation Take?
Per door: A standard replacement typically takes 2–4 hours from start to finish.
Factors that affect timeline:
- Door size and weight — larger panels take longer
- Wall type — stucco and brick add time
- Existing damage — rot or water damage adds repair time
- Accessibility — second-story or difficult access adds time
- Hardware complexity — multi-point locking systems take longer
- Custom sizes — non-standard openings require extra fitting
What you should plan for: Expect the installation to take most of a morning or afternoon. Be available for the final walkthrough.
How Much Does Sliding Patio Door Installation Cost?
Here’s what you can expect to pay in Arizona:
| Cost Component | Price Range |
| Standard two-panel vinyl slider (installed) | $1,500 – $3,000 |
| Two-panel fiberglass slider (installed) | $2,500 – $4,500 |
| Three-panel slider (installed) | $3,000 – $6,000 |
| Four-panel or large opening (installed) | $5,000 – $10,000+ |
| Labor only (per door) | $300 – $800+ |
Factors that affect cost:
- Frame material — vinyl is most affordable; fiberglass and aluminum-clad cost more
- Glass package — Low-E, argon fill, and impact-resistant glass add cost
- Size — custom and oversized units cost more
- Hardware — multi-point locking and premium hardware add cost
- Installation complexity — stucco, brick, and second-story installations cost more
Common Sliding Patio Door Installation Mistakes
After years of fixing bad installations, here are the most common mistakes we see:
Mistake 1: Improper Flashing
Improper or incomplete flashing is the #1 source of leaks. Flashing must be installed in shingle-style layers—sill first, then sides, then top. Skipping this step or doing it wrong leads to water damage.
Mistake 2: An Unlevel Track
If the track isn’t perfectly level, the sliding panel will bind and the rollers will wear out prematurely. This is one of the most common causes of “sticking” sliders.
Mistake 3: Using High-Expansion Foam
Standard expanding foam can bow the frame and lock the panel in place. Always use low-expansion foam designed for doors and windows.
Mistake 4: Insufficient Anchoring
Anchoring only into stucco or drywall leaves the door vulnerable to shifting and forced entry. The frame must be secured into structural framing.
Mistake 5: Skipping the Sill Pan
A sill pan directs water away from the wall. Without it, water can pool at the base of the door and cause rot.
Mistake 6: Poor Roller Adjustment
Rollers that are too tight cause binding; rollers that are too loose cause rattling and air leaks. Proper adjustment is essential for smooth operation.
Mistake 7: Not Checking for Rot Before Installation
Installing a new door over rotted framing is a recipe for failure. Inspect and repair the rough opening first.
Real-World Conditions: The “If/Then” Guide
Here’s how installation varies based on your specific situation:
If you have a stucco exterior → Then your installer needs to cut back the stucco to access structural framing. This requires skill—not all installers know how to do it correctly.
If you have a brick exterior → Then the installer will need to anchor through the brick and into the framing. Brick adds labor time but provides a solid surface.
If you have a wood-frame home → Then installation is more straightforward. The installer can anchor directly into studs through the siding.
If you’re replacing an existing slider → Then the installer will remove the old unit, inspect for damage, and install the new door. This may reveal hidden rot or structural issues.
If your opening isn’t square → Then the installer may need to modify the framing or use additional shims. Out-of-square openings require extra care.
If you’re installing on a second story → Then expect additional labor costs and safety considerations. Scaffolding or ladders may be required.
If you want maximum energy efficiency → Then choose a door with Low-E glass, argon fill, and a thermally broken frame.
If you have an older home → Then have the rough opening inspected for rot before installation. Repair it first.
If you’re comparing sliders to French doors → Then read our comparison of French doors vs sliding patio doors before you decide.
If you want a deeper dive into options → Then read our sliding patio door buying guide.
The Regrets Homeowners Mention Most
Here’s what homeowners tell us they wish they’d known about installation:
Regret 1: Hiring the cheapest installer
The lowest bid often cuts corners on flashing, anchoring, and sealing—the three things that matter most. Saving $200 on installation can cost you thousands in water damage repairs.
Regret 2: Not checking stucco experience
Arizona’s stucco homes require specific techniques. Installers who aren’t experienced with stucco may damage the wall or fail to flash properly.
Regret 3: Skipping the final inspection
Some homeowners don’t test the door thoroughly after installation. If the panel binds, the lock doesn’t engage, or there are gaps, you need to know before the installer leaves.
Regret 4: Not keeping warranty paperwork
Seal failures happen. The warranty is what protects you when they do. File the documentation somewhere you’ll find it.
Regret 5: Forgetting about maintenance
Sliding doors need track cleaning, roller lubrication, and weatherstripping checks. Neglecting maintenance shortens the door’s lifespan.
Regret 6: Choosing a door without Low-E glass
In Arizona, standard clear glass turns a patio door into a greenhouse. Low-E is not optional here.
Frequently Asked Questions
How long does sliding patio door installation take?
A standard replacement takes 2–4 hours. Larger or custom units may take longer.
How much does sliding patio door installation cost?
Labor typically runs 300–800+ per door. Total installed costs range from 1,500–5,000+ depending on door size, material, and glass package.
Can I install a sliding patio door myself?
We strongly recommend professional installation. Sliding doors are heavy, require precise alignment, and need proper waterproofing. Poor installation leads to leaks, sticking, and premature failure—and voids most warranties.
What’s the most important step in sliding patio door installation?
Waterproofing. Improper flashing is the #1 source of door leaks. Proper flashing and sealing prevent water damage, rot, and mold.
Why does the track need to be level?
If the track isn’t perfectly level, the sliding panel will bind and the rollers will wear out prematurely. An unlevel track is one of the most common causes of sticking doors.
Do I need a permit for sliding patio door installation in Arizona?
It depends on the scope of the project. Like-for-like replacements often don’t require a permit, but changing the size or location of the opening may. Check with your local building department.
What type of foam should be used around the frame?
Low-expansion foam designed for doors and windows. Standard high-expansion foam can bow the frame and lock the door in place.
How do I know if my sliding patio door was installed correctly?
Check that:
- The panel glides smoothly without binding
- The lock engages securely
- There are no gaps or drafts
- The frame and track are level
- The door seals tightly against the weatherstripping
How long do sliding patio doors last?
Quality units last 20–30 years with proper maintenance. Cheap rollers and seals fail much sooner.
What’s the difference between sliding patio door installation and French door installation?
Sliders glide horizontally on a track; French doors swing open on hinges. Sliders require track leveling; French doors require hinge alignment. Both require proper flashing and sealing. See our comparison of French doors vs sliding patio doors for more detail.
How do I maintain my sliding patio door after installation?
Clean the track regularly, lubricate rollers and locks annually, inspect weatherstripping, and check the seal for fogging.
Why Talk to Windowz4Less Arizona
Every opening is different. The only way to know exactly what your installation will involve—and what it will cost—is to get a professional assessment.
Windowz4Less Arizona works with homeowners across Mesa, Phoenix, Scottsdale, Gilbert, Chandler, and the surrounding Valley communities. We specialize in sliding patio door installation, know how to handle Arizona’s stucco exteriors, and can help you choose the right door and glass package for your sun exposure.
Your Next Step
If you’re ready to schedule sliding patio door installation—or just want to know what it will involve for your home—start with a free in-home estimate.
Contact Windowz4Less Arizona today for a free, no-obligation estimate. We’ll assess your opening, walk you through the installation process, and provide professional work you can trust.